Segmentation
Tree canopy extraction is a vital task in many environmental and land management projects, often performed using segmentation processes in ArcGIS Pro. The quality of segmented rasters plays a crucial role in the accuracy of object-based image classification outcomes. Poor segmentation can lead to inaccurate classification results, affecting the overall analysis.
Segmentation is a process that groups nearby pixels into segments based on various criteria like shape, spectral attributes, and spatial characteristics. These segments are then merged to form classes representing real-world features on the ground. Understanding how to create well-structured segmented rasters is essential for achieving more precise image classification results. This lesson will guide you through the steps involved in crafting high-quality segmented rasters, ultimately improving the accuracy of your image classification processes.
Create segmented raster
Picture yourself as a GIS analyst on a resource mapping team tasked with assessing the tree canopy from forest using image classification techniques. To aid in this classification endeavor, you have received raster data collected by unmanned aerial vehicles (UAVs). The initial and essential step in developing a dependable thematic raster for classification purposes is raster data segmentation.
In this practical exercise, you will employ the Segment Mean Shift raster function to identify the optimal parameters for generating a segmented raster. Once these parameters have been established, you will utilize the Segment Mean Shift geoprocessing tool to produce the raster that will serve as the foundation for creating training samples.
During this exercise, you will undertake the following actions:
• Tune segmentation parameters.
- Generate a segmented raster.
Step 1: Add the input raster
In this step, you will add the input raster of the damaged area that was obtained using a UAV.
a) If necessary, restore ArcGIS Pro and the Image Analysis project.
b) Insert a new map and name it Segmentation Canopy.
c) In the Catalog pane, from the IMAP folder, expand Data and Rasters, if necessary, and then right-click Forest_Canopy_Orthomosaic.tif and choose Add To Current Map.

d) Pan and zoom around the raster to review the canopy areas. The focus of this analysis is to extract the canopy.
e) When you are finished, zoom to the full extent of the recovery area.
Step 2: Create initial segmentation
In this step, you will apply the Segment Mean Shift function to see how well the segments represent real-world features.
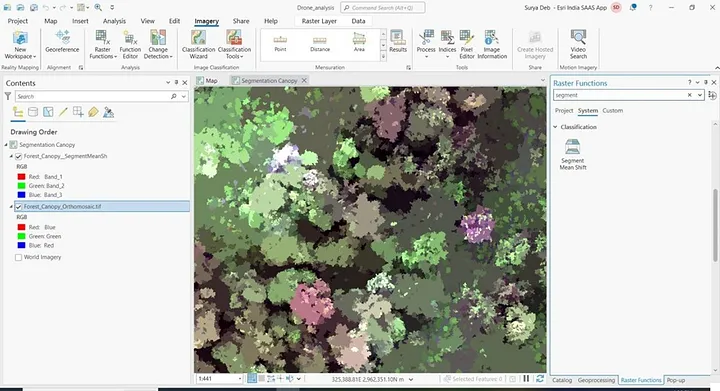
a) From the Imagery tab, open the Raster Functions pane, and then search for segment.
b) Click the Segment Mean Shift raster function to open the properties.
c) In the Segment Mean Shift Properties pane, for Raster, choose Forest_Canopy_Orthomosaic.tif
d) Accept all other defaults and click Create New Layer


a) Right-click the Segment Mean Forest_Canopy_Orthomosaic.tif layer and choose Zoom To Source Resolution
b) Pan and zoom the map to view the building with the arched driveway, as shown in the following graphic
c) Go to book mark and click canopy


d) From the Raster Layer tab, in the Compare group, use the Swipe tool to evaluate the segments.

A few area segments of canopy is matched some places its showing not to captured properly and some place same canopy captured in many segments due to different in reflectance.
Step 3: Improve the segmented results
In this step, you will modify the balance of parameters to improve the segmentation results.
a) In the Contents pane, right-click the Segment Mean Shift Forest_Canopy_Orthomosaic.tif layer and choose Edit Function Chain to open the Function Editor.
b) Expand the Function Editor view, and then open the Segment Mean Shift function properties and specify the following parameters:
• Spectral Detail: 16.5
• Spatial Detail: 10
• Minimum Segment Size In Pixels: 200
c) Click OK.
d) On the Function Editor toolbar, click the Apply button to accept the changes to the function.
e) Close the Function Editor
Now this time the result was little better than the last default one. Go to bookmark and check the same place. Then you will see the better results.
f) Close the map, and then from the View tab, reset the ArcGIS Pro panes to the default
g) Save the project and keep ArcGIS Pro open

Training the classifier
In supervised image classification, the classifier needs training samples to make informed decisions when categorizing pixels or objects. Consequently, supervised classification depends significantly on user input. Users supply training samples, which are then integrated into an Esri classifier definition file employed in the raster classification process. The attributes of these training samples are determined by the chosen image classification method and are further shaped by the specific classifier being utilized.
In this instructional session, you will gain insights into best practices for crafting training samples and proceed to generate a classified thematic raster.
Training samples can take the form of points, polygons, or segments, depending on the class they aim to represent. When gathering training samples, it’s crucial to ensure that you collect samples representing all the classes that will ultimately appear in your final classified raster. Additionally, it’s advisable to obtain a sufficiently large collection of pixels within each sample to accurately capture the characteristics of the feature of interest. This size is important for meaningful statistical comparisons with other collected samples.
Inadequate training samples or overly small sample sizes can introduce distortions into classification results. The geographic extent covered by each training sample can vary based on how the sample is collected. Training samples can be either pixel-based or object-based, and the distinctions between the two will be explained below.
Pixel based classification
In the context of pixel-based image classification, it’s essential for training samples to pinpoint areas of pixels that exhibit spectral uniqueness and possess a well-defined, discrete range of pixel values. When working with higher spatial resolution images, the increased spectral diversity can necessitate a higher number of classes to accurately represent the raster, and correspondingly, a greater number of training samples for each class.
Distinctive training samples play a pivotal role in minimizing the likelihood of misclassification. This classification method evaluates each pixel in isolation, which means that incorporating contextual pixels can lead to confusion between classes. For instance, in the case of supervised pixel-based image classification for a parking lot, you would create distinct training samples for the asphalt areas and any paint striping to ensure accurate classification.
Object base Classification
In the realm of object-based image classification, training samples should encompass an abundance of contextual information to faithfully represent the intended feature or object. This approach places importance on retaining the relationships between pixels within a segment, making segmented raster’s a prerequisite for object-based image classification. In this context, a well-segmented raster serves as the linchpin for a productive supervised object-based image classification.
Training samples
To effectively select training samples within a segmented raster, it is recommended to utilize the Segment Picker tool, which is available in ArcGIS Pro. This tool facilitates the task of choosing training samples and contributes to the overall success of the classification process.
Creating training samples
Envision yourself as a GIS analyst specializing in imagery classification, where your goal is to distinguish tree canopies within a forest drone image. After having generated a well-structured segmented raster from the original data, the next step involves gathering training samples for a supervised object-based image classification.
Utilizing the Training Samples Manager, you will craft these training samples and subsequently produce an Esri classifier definition file, a pivotal component in the classification process.
Creating training samples using the training sample manager
If not finished the previous step to creating segmentation then repeat this part
Step 1: Add input data
a) If necessary, restore ArcGIS Pro and the ImageAnalysis project.
b) Insert a new map and name it Training.
c) From the Catalog pane, in the Rasters folder, add the Forest_Canopy_Orthomosaic.tif file to your map.
d) Expand the Output folder, and then add Forest_Canopy SegmentMeanSh1.tif to the map
For this exercise, instead of creating training samples of the whole raster, you will create training samples on a portion.
e) Go to the bookmark area for collecting training samples from that location.


Step 2: configure the training sample manager
Now that you have evaluated the training area, you are ready to configure the Training Samples Manager.
a) In the Contents pane, select the segmented raster and make it visible in the map.
b) From the Imagery tab, in the Image Classification group, click the Classification Tools down arrow and choose Training Samples Manager.

The default image classification schema is the NLCD2011 schema. For this image classification, you have identified classes for the burn damage that are not within the schema. Rather than modify this schema, you will use a custom schema.
c) At the top of the Training Samples Manager, click the Create New Schema button to clear the schema.
d) Right-click New Schema and choose Edit Properties.


e) In the Edit Schema Properties pane, update the Name to Canopy and click Save.
f) In the Training Samples Manager pane, right-click the new Recovery schema and choose Add New Class.
g) In the Add New Class pane, specify the following parameters:
• Name: Canopy
• Value: 1
• Color: Green color
h) Click OK to add the class.
You will add another class for Canopy.
In the Training Samples Manager, click Canopy
i) Create a not_canopy class with a value of 2 and a Yellow color

Step 3: collect Training samples
Now that the Training Samples Manager is configured, you are ready to start collecting training samples.
To ensure that your segment is used by the classifier, you can use the Segment Picker tool. With this tool, training samples can be easily collected as full, contiguous segments, which helps maintain the uniformity of your training samples.
a) In the map, locate one of the tree canopy to use as a training sample.
b) In the Training Samples Manager, select the tree canopy class, and then click the Segment Picker button
Because you have the segmented raster selected in the Contents pane, the Training Samples Manager will include the layer name at the top of the Image Classification pane. The segmented raster can also be selected from the Segment Picker button down arrow, if necessary.
c) In the map, click an appropriate segment.


The outline of the training sample becomes the edge of the segment, and its symbology matches the symbology that you set in the schema. Having a properly segmented raster is important for an accurate image classification for this reason. When the segments combine multiple features, there is the risk that the classification results may not be as accurate as desired.
d) Collect few trees canopy sample and one not_trees canopy sample.
Sometimes, because of slightly different spectral characteristics, single features that are contiguous get split into different segments. In your own work, you could address this issue by using different tools to collect training samples based on user-defined feature characteristics.
e) Now collapse all trees canopy samples in one group

f) Now take some not canopy samples and then again merge them together using collapse option
g) In the Training Samples Manager, with Building selected, click the Polygon tool .
h) In the map, locate one of the non-canopy area that you did not select with the Segment Picker.
Draw a polygon around the non-canopy (one that you did not select with the Segment Picker), double-clicking to finish the drawing.

When using the Polygon tool, you must draw the polygon around more than half the segment for it to be considered in the classifier definition. If your training polygon covers less than 50 percent of the segment, it will not be considered by the classifier.
Step 4: save the training samples
Now that you have created some training samples, you will save them as a feature class to create an Esri classifier definition in the next part.
a) In the lower section of the Training Samples Manager, click the Save As button
b) Browse to location and save the feature class as FinaltreeCanapySample.shp

c) Close the Training Samples Manager
If a message window appears, click No to dismiss it. You have saved the training samples and do not need to save the schema for this effort.
d) Save the project, and then leave ArcGIS Pro open for the next part.
In this exercise, you used the Training Samples Manager to create a new training samples schema and collected several classification samples from the segmented forest canopy raster.
Next, we will apply the Support Vector Machine classification method to the segmented image using the collected samples to perform the classification.
Support Vector Machine Classification
This supervised machine-learning classification technique is ideally suited for segmented rasters but can also be applied to various other multispectral imagery formats. The algorithm’s approach involves establishing the maximum separation between class samples and subsequently deducing an optimal hyperplane based on this separation. Furthermore, the process concentrates on training samples located at the extremes of the class distribution, enabling the calculation of both a positive and a negative marginal hyperplane.
The derivation of these marginal hyperplanes and their respective distances from the optimal hyperplane involves extending an orthogonal margin outward until it intersects with the nearest samples. These specific samples at the intersection of the two marginal hyperplanes are referred to as the “support vectors”.
A support vector machine (SVM) classifier offers several advantages over parametric classifiers like the maximum likelihood classifier. SVM requires only a limited number of input samples, which enhances efficiency, particularly when working with segmented raster’s. Unlike some classifiers, SVM doesn’t assume or rely on the normal distribution of samples. Furthermore, it demonstrates resilience to noise, correlated bands, and variations in the number or size of samples among different classes.
Create a classified thematic raster
As our journey in the role of a GIS analyst continues, we now approach the final stages of the image classification process for identifying tree canopies within an Assam forest image that was previously segmented. With the segmented raster and training samples in place, we are well- prepared to proceed by generating the Esri classifier definition file and conducting the raster classification.
In this practical exercise, we will employ the Train Support Vector Machine Classifier and Classify Raster tools to produce the thematic raster that will serve as the culmination of our classification efforts.
During this exercise, you will complete the following tasks:
• Generate an Esri classifier definition file.
- Produce a classified thematic raster.
Step 5: create a classifier definition file
In this step, you will create the Esri classifier definition file based on the training data.
a) In the Geoprocessing pane and search for support vector
b) Open the Train Support Vector Machine Classifier (Image Analyst Tools) tool and specify the following parameters:

• Input Raster: Forest_Canopy SegmentMeanSh1.tif
• Input Training Sample File: select FinaltreeCanapySample.shp
• Output Classifier Definition File: save in located folder as canopy.ecd
• Maximum Number of Samples Per Class: 0
- Segment Attributes: select all

c) Click Run

Step 6: Create classified thematic raster
In this step, you will create the classified thematic raster to perform the canopy assessment
a) At the top of the Geoprocessing pane, click the Back button, and then search for classify raster

b) Open the Classify Raster (Image Analyst Tools) tool and specify the following parameters:
• Input Raster: Forest_Canopy SegmentMeanSh1.tif
• Input Classifier Definition File: canopy_final.ecd
• Output Classified Raster: Forest_Canopy_Classified.tif
c) Leave the remaining default and click Run.
d) In the Contents pane, turn off the visibility of the TrainingArea layer and zoom to the full extent of Forest_Canopy_Classified.tif layer.


Step 7: Extract target class
You will now extract the canopy class from the classified thematic raster to use for further analysis.
a) In the Geoprocessing pane, click the Back button and search for extract attribute. Open the
b) Extract By Attributes tool and specify the following parameters:
• Input Raster: Forest_Canopy_Classified.tif
• Where Clause: Class_name Is Equal To canopyclass
- Output Raster: canopy_Only.tif


To begin, we’ll initiate the segmentation process using the Segment Mean Shift tool. We’ll experiment with different parameters to achieve better segmentation results. After segmenting the image, we’ll create training samples for both canopy and non-canopy areas. These samples will be used to train a Support Vector Machine classifier.
Once the classifier is trained, we’ll use it to classify the image, identifying canopy and non-canopy areas. The final step involves extracting the canopy areas using the Extract by Attributes tool. This process will help us understand how to accurately extract tree canopies using ArcGIS Pro.
